The Protolabs Network Standard
Mold standards
Custom tooling property
All custom tooling developed by the customer for its parts is the property of the customer, however reusable proprietary components or components developed by the manufacturing partner will remain the manufacturing partners property. All custom tooling will remain at the partner’s facility for a minimum of two years, unless otherwise agreed. After a two-year period of inactivity of the tooling, the manufacturing partner may contact Protolabs Network to determine if the tool must be retained for any additional period of time.
What you can expect for rapid and production tooling
Protolabs Network offers rapid and production tooling for injection molding.
Rapid tooling
For rapid tooling the mold base can be shared, with your approval, and is usually machined with 1050 Steel.
The cavity and core of the mold are typically machined with P20H tool steel or 7075 Aluminum:
-
Rapid aluminium tooling for volumes up to 10000 shots
-
P20H tooling for volumes up to 100,000 shots
NAK80 and S136 tool steel can also be used for rapid tooling.
It is the responsibility of the Manufacturing Partner to choose the tooling material, not necessarily listed above, in order to guarantee the mold life.
Production tooling
Production tooling is often made from hardened P20H, H13 or other tool steel suitable for repeated use and long tool life. Heat-treating and surface hardening or plating are also often used.
Mold finish standards
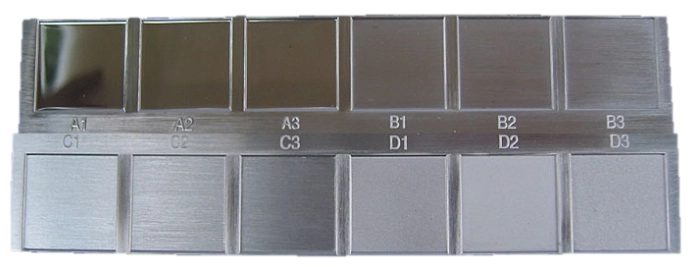
The post-processing options offered by Protolabs Network follow SPI 1998 Standards and Practices of Plastic Molders:
Glossy Surface, Diamond Buff Polish
-
SPI A-1 - Grade #3, 6000 Grit Diamond Buff - Ra 0.012 to 0.025 µm
-
SPI A-2 - Grade #6, 3000 Grit Diamond Buff - Ra 0.025 to 0.05 µm
-
SPI A-3 - Grade #15, 1200 Grit Diamond Buff - Ra 0.05 to 0.10 µm
Semi-glossy Surface, Paper Polish
-
SPI B-1 - 600 grit paper - Ra 0.05 to 0.10 µm
-
SPI B-2 - 400 grit paper - Ra 0.10 to 0.15 µm
-
SPI B-3 - 320 grit paper - Ra 0.28 to 0.32 µm
Matte Surface, Stone Polish
-
SPI C-1 - 600 grit stone - Ra 0.35 to 0.40 µm
-
SPI C-2 - 400 grit stone - Ra 0.45 to 0.55 µm
-
SPI C-3 - 320 grit stone - Ra 0.63 to 0.70 µm
Textured Surface, Dry Blast Polish
-
SPI D-1 - 600 grit, dry blast glass bead #11 - Ra 0.80 to 1.00 µm
-
SPI D-2 - 400 grit, dry blast #240 oxide - Ra 1.00 to 2.80 µm
-
SPI D-3 - 320 grit, dry blast #24 oxide - Ra 3.20 to 18.00 µm
As machined
As machined finish is also offered. In this case, tooling marks are still visible on the surface of the mold. The standard surface roughness for an "as machined" finish is Ra 3.20 µm.

The surface parameter Ra is defined as per ISO 4287:1997.

Molds and parts identification
Each cavity is marked with the number or letter, which will make identification of the part possible. Procedure will be applied for molds with more than 1 cavity. Proposal of marking area will be sent to you in DFM before mold production. Additionally production date identification is provided, when asked during quotation. Samples from each batch are stored in the facility and compared with next ones.


